
Tuesday, 28 February 2012
Cameras
The image below shows my fist use of cameras. To create this animation I started by creating a set of random shapes. Then I used the spline tool to draw a line for the path that the camera would follow around the objects. Then I created a free form camera and then added the line as the path constraint for the camera. Then the camera had to be pointed in the correct direction and then the lenses had to be selected. Then under the path options under the motion tab, I selected the follow option and the bank option to make the camera move along the line that had been drawn earlier. From this I have learnt how to use cameras to create an effective animation. These skills can be applied to my final animation.
First animation

The image above shows my first attempt at animating with 3ds max. For this animation I started by creating a sphere and then using the auto key and set key with the timeline, I made the ball move up and down. Then using the track curve editor, I changed the change the movement speeds of the balls making it more closely resemble a bouncing ball. Then I made the animation loop and copied the ball two more times. Using the dope sheet the balls were then made to bounce at different times and different speeds.
From creating this animation I have learnt a number of skills and features within 3ds max. I have learnt how to properly use the timeline and set key frames automatically and manually. Also I have learnt how to increase and decrease the length of the timeline. Also I have learnt how to use the basics of the curve and dope sheet. All of these skills can be applied to my final project.
Tuesday, 21 February 2012
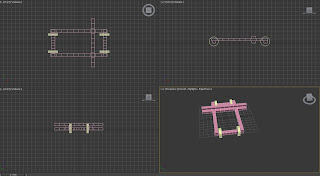
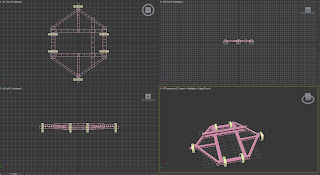
Siege engine base
The images below show the creation of the base of the siege engine. The base is created using simple boxes and cylinders for the wheals. In order to keep all the parts the same size and therefore the model proportional, the parts are mainly copies of each other and then moved and rotated into place, and the length was changed. But the main thing was to keep the width and height of the beams the same. The main problems I have had with the base was to make sure all the parts line up correctly and also to ensuring everything is level. As the two lower images show I had a problem keeping the base structure flat and the wheals all at the same level, though I eventually overcame this problem.


Arrow model
The images below shows step by step the creation of an arrow. The first phase of creating the arrow was to create the head of the arrow. This was done by first drawing a pyramid and then adding segments. Then poly modelling was used to create the desired shape that resembles an arrow head. Once the correct shape was created, a steal texture was added. The next phase was to create the shaft of the arrow. The shaft was a simple cylinder placed with the head of the arrow. Once the right size of the cylinder was defined a wooden texture was added from the architecture and design metal ray renderer. Finally the fletching of the arrow needed to be added. There needed to be three parts of the fletching and in order to do this only one of the fletching’s was created and then two copies were made of the originally fletching. The original fletching was created by first drawing a cube and adding segments. Then the using poly modelling the cube was moulded into a shape that closely resembles fletching. Once the right shape had been made, the colour was added and three copies were made and placed on the shaft of the arrow.


Sunday, 19 February 2012
Storyboard
The image below shows the first sketch of the storyboard. This is a basic sketch of what the animation may be about. Though the storyboard of the animation is likely to change depending on what animation skills are learnt in the following weeks and depending on time constraints.


Friday, 17 February 2012
Flying machine mood board

References:
4.bp.blogspot.com, n.d. 4.bp.blogspot.com. [image online] Available at: <https://blogger.googleusercontent.com/img/b/R29vZ2xl/AVvXsEgEj78uvYJN22yMKA56ELsaQZodKPaXWJ71qz3ogQe1O-HJdjNZpzNoKq7PH0rH3amskk34JAZhDluDSuv5rznpCgAzQRYX7zVnub8GoABMk-ecrHAFMhpIJOuEaF5LwbpUt2zeWHp82yc/s1600/96240-004-A9CAD60A.jpg> [Accessed 15 February 2012].
Leonardo da Vinci, 1488. Design for a Flying Machine 2. [image online] Available at: <http://inventors.about.com/od/dstartinventors/ig/Inventions-of-Leonardo-DaVinci/Design-for-a-Flying-Machine-2.htm> [Accessed 18 February 2012].
3drivers.com, n.d. Leonardo da Vinci flying machine. [image online] Available at: <http://www.3drivers.com/catalog/311/7891/> [Accessed 18 February 2012].
Dane Carlson, 2012. Today in entrepreneurial history: January 3. [image online] Available at: <http://www.business-opportunities.biz/2012/01/03/today-in-entrepreneurial-history-january-3/> [Accessed 18 February 2012].
fiddlersgreen.net, n.d. DaVinci Aerial Screw Helicopter downloadable cardmodel. [image online] Available at: <http://www.fiddlersgreen.net/models/aircraft/DaVinci-Airscrew.html> [Accessed 18 February 2012].
Lindsey, 2010. Xbox Live Deal of the Week: Assassins Creed II. [image online] Available at: <http://www.maroonersrock.com/2010/07/xbox-live-deal-of-the-week-assassins-creed/> [Accessed 18 February 2012].
PhantomT1412, n.d. Flying Machine. [image online] Available at: <http://assassinscreed.wikia.com/wiki/Flying_Machine> [Accessed 18 February 2012].
Master Sima Yi, n.d. Flying Machine. [image online] Available at: <http://assassinscreed.wikia.com/wiki/Flying_Machine> [Accessed 18 February 2012].
Archigraphs, n.d. FlDa Vinci Flying Machine Icon. [image online] Available at: <http://www.awicons.com/free-icons/game-icons/assassins-creed-icons-by-archigraphs/da-vinci-flying-machine-icon> [Accessed 18 February 2012].
Research on who Leonardo di ser Piero da Vinci was
In order to properly animate one of da Vinci’s inventions you must first know some background information on who da Vinci was and what he had achieved. Below is some information about da Vinci and his life:
Leonardo di ser Piero da Vinci (April 15, 1452 – May 2, 1519) was an Italian polymath, having been a scientist, mathematician, engineer, inventor, anatomist, painter, sculptor, architect, botanist, musician and writer. Born as the illegitimate son of a notary, Piero da Vinci, and a peasant girl, Caterina, at Vinci in the region of Florence, Leonardo was educated in the studio of the renowned Florentine painter, Verrocchio. Much of his earlier working life was spent in the service of Ludovico il Moro in Milan. He later worked in Rome, Bologna and Venice, spending his final years in France at the home given to him by King François I.
As an engineer, Leonardo's ideas were vastly ahead of his time. He conceptualised a helicopter, a tank, concentrated solar power, a calculator, the double hull and outlined a rudimentary theory of plate tectonics. Relatively few of his designs were constructed or were even feasible during his lifetime, but some of his smaller inventions, such as an automated bobbin winder and a machine for testing the tensile strength of wire, entered the world of manufacturing unheralded.
Leonardo da Vinci inventions


Leonardo da Vinci, n.d. italyconnoisseurs.com. [image online] Available at: <http://www.italyconnoisseurs.ru/eventi/wp-content/immagini/leonardo_davinci.jpg> [Accessed 15 February 2012].
thetoyzone.com, 2009. thetoyzone.com. [image online] Available at: <http://www.thetoyzone.com/wp-content/uploads/2009/07/davincitank_thumb1.jpg> [Accessed 15 February 2012].

Kaimai school, n.d. kaimai school. [image online] Available at: <http://www.kaimai.school.nz/leonardo/images/tank_image.jpg> [Accessed 15 February 2012].

Leonardo da Vinci, n.d. buzzle.com. [image online] Available at: <http://www.buzzle.com/images/drawings/leonardo-da-vinci/flying-helicopter.jpg> [Accessed 15 February 2012].

usahobby.com, n.d. usahobby.com. [image online] Available at: <http://www.usahobby.com/images/elenco/61002.gif> [Accessed 15 February 2012].

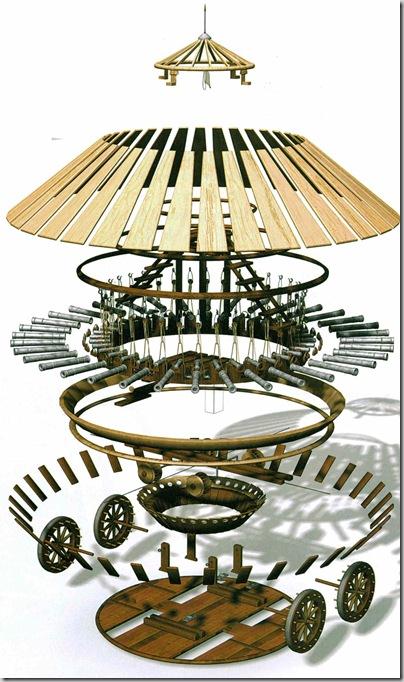
Leonardo da Vinci, 1480. Machine for Storming Walls. [image online] Available at: <http://inventors.about.com/od/dstartinventors/ig/Inventions-of-Leonardo-DaVinci/Machine-for-Storming-Walls.htm> [Accessed 18 February 2012].
Wall design
The image below shows the wall that has been created. This wall will be part of the main animation, along with da Vinci siege engine. This will be the wall that the siege engine will attack. In order to create this wall a number of simple things were done. The main bulk of the wall consists of a number of simple boxes used together and then replicated using arrays to create a large wall. The stairs were created using the stairs option, using L-type stairs with the box parameter ticked. Finally the textures were added using the architecture and design mental ray render. The masonry and concrete textures were used, although these may be changed at a later date depending on how the overall finish of the animation looks.


Tuesday, 14 February 2012
poly modelling
The images below show the creation process of an apple using poly modelling. Plus the skills needed to bend a simple box. The apple was created by first making a sphere and then converting it to an editable poly. Then by pressing F4, all the polygons become visible in the form of a grid pattern. Using soft selection the top and bottom of the apple can be indented to give the apple more of a natural shape and create room for the stalk. The stalk was then added by drawing a tiny cylinder and adding extra height segments. This then means that the cylinder can be slightly curved and thickened at the end to give it a natural stalk shape. Finally the apple is given a few bumps with vector editing to make the apple look a little less perfectly round and the colour is added.


In order to bend the box, you must first draw a simple box and then add height segments. This then gives the box a number of sections and therefore allows the box to be curved into a banana like shape.


Daylight system
Below is my implementation of a daylight system and architectural materials. In order to use architectural materials the renderer had to be changed to the mental ray renderer. When creating the image a floor is need in the image in order to show the shadows on the floor. So a floor was created using a basic box. Then the teapot and a torus are draw and the textures were added. Architectural textures were selected and then one of the options from the pre-set templates was used. The teapot uses the ceramic tile, glaze template and the torus used the metal template. Then the daylight system was created. When setting up the daylight system a location was decided where to place it and then the time, date and location (where in the world would you like to imitate) were selected. These settings would change the intensity and direction in which the light shines from. Finally the image was rendered.


The image below show the first time I experimented using different lighting within 3ds max. The lighting created below uses and omni inside the pumpkin and a free spotlight to create the light shining on the pumpkin. The omni has a slight orange tint in order to try and mimic a candle light. The spot light is tinted green and has a volume light effect with a density of 0.1. These lighting effects that I have learned can be used within my assignment to create a realistic animation and help to set the mood and tone of the scene. This can then be used to change the time of day/weather that my animation is set and to replicate candle light.


Monday, 13 February 2012
Daysoutinbritain.com, n.d. Norwich Castle. [image online] Available at: <http://www.daysoutinbritain.com/images/2011/03/15/40/norwich-castle_1.jpeg> [Accessed 13 February 2012].


Tuesday, 7 February 2012
The images below show step by step how I took a picture of a leaf and removed the background with the help of Photoshop. Then imported the images into 3ds max and added the textures to a plane, then converted it to an editable poly. Once the plane is an editable poly I then started to curve and add indents to the image. This was in order to try and make the image look more realistic. Finally I rendered the image and saved it as a jpeg. From doing this I have learnt how to render my creations and the different options I have to choose from when rendering. This has also improved my skills with textures and showed me how to remove the background from textures and add them to a plane.


textures
The images below shows the textures I have added to the castle I made in week one. I found that adding the textures can really bring my designs to life if done correctly. But I learnt that it can be hard to find the proper textures needed. Then it can also be rather hard to make the textures look natural and realistic. One example of this is that originally when I clicked render the image looked too bright and plastic. But as the images below show I done the doors of the castle last and I believe these look the most realistic. But adding textures will be a key area that I will have to put time and effort into my project to make my animations look as realistic as possible.


Subscribe to:
Comments (Atom)